Monday 21 April 2014

WICKED LIMECRIME VELVENTINE DUO with E.L.F Lip Definer and Rimmel Lip Liner

Helllooo my beautiful people!

So as you know I was on the hunt for a lipliner to match (or close to) my amazing wicked lime crime velventine so I could apply this stuff sharply and defined and get a gorgeous full long lasting lip!

I purchase the rimmel Lasting Finish Lip Liner in 071 Cherry Kiss. As you guys know wicked is a burgundy red/cherry and plum colour!

Duo:

Limecrime Velventine Wicked
E.l.f professional lip defining brush (really hard pointed so perfect for the precision needed for defined sharp looking lips)
Rimmel London Lasting Finish 071 Cherry Kiss

Application:

Line your lips with the Rimmel London Lasting Finish 071 Cherry Kiss! Then use your lip defining brush and dip that onto the end of the lime crime velventine lip stain and apply it too your lips! Its that easy! You could also use the definer to go around the edges of your lip following the line you have created with the Rimmel London Lip Liner!!


And… heres a swatch for you guys! The line is the liner and the smudge is the lip stain! They don't to totally look exact in the photo but in real life they are pretty much the same, the liner has a slight tinge of purple but this would mesh into the lip stain really easy!


Till next time beauties! 
Laeken x

Remember to follow me on blog lovin! It will make my day ! and also comment below any feedback or questions as I would love to talk with you guys! XXXXX


FIRST IMPRESSION | Rimmel The Max Volume Flash Mascara

Hello Lovelys!

FIRST IMPRESSION | Rimmel The Max Volume Flash Mascara


So yesterday I popped into Kmart, (for those of you elsewhere other than New Zealand its like equivalent to Target or warehouse types stores) and saw Rimmel had $5.00 off which really made a difference considering how expensive make up is in New Zealand. So it retailed at $20 and I got it for $15 so I really wanted to expect some quality from this stuff, I mean $15 is still expensive really!

So first off I really love the packing, its pink, sort of fuscia! and if you're girly like me you'll love this! I saw it had a thick wand which you would assume to apply the mascara in a full voluminous way, so all was amazing UNTIL the wand hit my lashes… the love for this product immediately stopped!

Firstly you should know I have really short thin lashes and so I was looking for something that gives volume (as I wanted to use this in combination with a fibre mascara that already gives me length!)

I applied three coats of this stuff and honestly it did nothing. It only made my lashes black and boy did they look so limp and sad! I am so disappointed. I honestly though this was going to "max out the volume" of my lashes.

This is what the mascara claims to do according to the ultra.com website:

"Take your eyes to the max with the supersized, perfect-fit brush that works in perfect synergy with the exclusive quick setting Lash Expand formula. The cushion-like collagen effectively binds to each individual lash, while the keratin works to smooth the surface of the lashes, leaving them stronger, sleeker and shinier. Capture that edgy London look than with big, bold attention-grabbing lashes."

Ingredients:

Aqua/Water, Linum Usitatissimum (Linseed) Seed Oil, Paraffin, Cera Alba/Beeswax, Acrylates Copolymer, Diisostearoyl Polyglyceryl-3 Dimer Dilinoleate, VP/VA Copolymer, Stearic Acid, Glyceryl Stearate, Cera Carnauba/Copernicia Cerifera (Carnauba) Wax, C18-36 Acid Triglyceride, Sorbitan Sesquioleate, Arginine, Tocopherol, Caprylyl Glycol, PEG-30 Dipolyhydroxystearate, Panthenol, Talc, Triethoxycaprylylsilane, Sodium Dehydroacetate, Sodium Laureth Sulfate, May Contain: Iron Oxides (Combined CI 77491, CI 77492, CI 77499 = CI 77491).

Now… you tell me if my lashes look like "big, bold attention-grabbing lashes.."


THIS WAS THREE COATS EVERYONE, THREE COATS! and I even used a eyelash curler to give this mascara a bit of a boost!


(Sorry for the redness, I had just rubbed my eye make up off to apply this "bold attention grabbing mascara ;) )

Pros:
I was really not happy with this product. No length and no volume, what makes a girl happy about that! and its totally not doing what it claims to do - make your lashes 14x more volume. Sadly there was NO volume! ):

Cons:
Honestly this mascara does nothing, it only makes your eyelashes black but there is no volume at all and only the most minimal length is created.

So all in all sadly I have a hate relationship with this stuff, in fact there sadly is no relationship with this stuff ): If those of you out there have long luscious eyelashes and just want some colour, well this mascara can really only offer you that but every mascara does anyway!

Till next time beauties!
Laeken x
Be sure to follow me! Im just a normal teenager in love with makeup so I'd love to converse with all you makeup junkies out there and follow you also!  Have a fab day!


REVIEW | THEBALM MARY-LOU MANIZER HIGHLIGHTER

REVIEW | MARY-LOU MANIZER

Hi beaautieees!

So I recently purchased the THEBALM Mary Lou Manizer off Strawberry Net for the price of $23 dollars so way cheaper than a lot of the other online stores which is really great. I suggest when your looking for the more higher end brands definitely search around the web for the lowest price simply by putting your product name into google and then your country after it. But for me living in New Zealand, the balm isn't sold here unfortunately but I found it the cheapest on strawberry net and at the moment if you spend over $25 dollars US you get a freebie to pick which is amazing! I grabbed the Calvin Klein Eyeshadow! So with saying this I definitely recommend looking there for any higher end brand before you look elsewhere because they have amazing deals!

Anyway, onto the product! This is one of the most amazing highlighters I have ever purchased! The packaging it so cute and appealing! It has a 1950's girl on it and states her offences in the field of the highlighter which I though was such a neat idea. The consistency of the highlighter is in powder form and is very very smooth. There is certainly ALOT of product in the Mary Lou Manizer so you defiantly get what its worth. Even more exciting is that you hardly need to use much of this product at all to obtain a natural shimmery glow so I can see this product lasting forever!


Pros:
So pigmented, you only need a little bit of the product so its definitely worth the $20-30
Shimmery
Gorgeous packaging
Long Lasting Power
Glides straight on
It would also put an amazing shimmery glow on anyone with fair skin!
No Parabens!

Cons:
It can be really easy to swipe too much of this product and appear way too shimmery BUT this is easily controlled by just swiping some on your brush and then just tapping the extra amount off your brush

So with all this said HELL YEAH i'd purchase this again! I for sure will not be buying anymore highlighters for a long long time and when I do you can be sure I will jump on to strawberry net and get ANOTHER one! Have a lovey day!

Laeken x
Please comment any feedback in the section below or any questions because I'd be happy to answer!


Saturday 19 April 2014

IDEAS?!

Hi Lovelys!!

I hope your all having a great easter weekend and have gotten amazing goodies! Sorry I haven't updated in a few days! Thank you all so much for following me! It would be great if you could take a few seconds to comment below what you would like to see most? More DIY, Reviews, fashion lookbooks, hauls etc as I want to upload content that is most interesting and that you guys want!

Laeeken x

Tuesday 15 April 2014

FIRST IMPRESSION | REVIEW | LIMECRIME VELVENTINE WICKED

Hello beauties!

(If you can't be bothered reading this long review, skip to the pros and cons <3 I have just made it in depth because it is expensive and you do want to know what your buying is amazing right!?)


So many of you may or may not know about the new brand called lime crime! I purchased their wicked lime crime velventine from their "clueless witch collection."So pretty much what it is is a lip stain which goes on in a liquid state and turns matte within seconds!

Limecrime claims to be"touch-proof, transfer proof, long wearing, and utterly addictive."

Well what can I say the colour I purchased "wicked" is definitely a beautiful deep berry/burgundy red colour which I have fallen in love with!

When I first pulled the applicator out of the pot I was so scared to apply it to my lips because this colour is so deep and vibrant, and so pigmented! I have honestly never met a lip stick to be so strongly pigmented! I haven't done a swatch for you guys, reason being because it is so expensive so I don't want any of the product to go unused! It retails at $30 on beauty bliss, so quite the money stealer but its definitely worth it as i can't see why!

So lets get into how this product applies, and is it really long lasting, non transferable!?

So for starters, you will FOR SURE need to apply this stuff with a lip brush and line your lips with a deep plum colour, two things I don't have! So I used the applicator, which worried me because I knew how strong this stuff was! make one mistake and you can't get it off! Anyway, the outcome of using the applicator soley was alright, but I definitely didn't have sharp lines which are a must for me!. So I can say if you have a liner and a lip brush you'll be sweet!

Next thing I noticed was you have to work fast with this stuff because it dries like crazy fast! This is a positive and a negative in itself. Because I was using the applicator, I was extremely slow with applying it for fear I would make a mistake and completely ruin my lips! Therefore I noticed once I finished there were some darker areas and lighter ones as I was taking my time around the inner corners of my lip and so the product became extremely concentrated there ):. Anyway, NEVER fear, it came out looking perfect from a distant but up close you could notice this problem with the difference in pigmentation and the jagged lines!

With respect to its claims, it is definitely long wearing IF you don't eat food. I ate a pita pocked and noticed red was transferring onto it, so therefore its not totally non-transferable! I mean it was nothing major but was transferable. So with saying this, don't eat and you'll be sweet ;) Eeven though some had come off, my lips were still pretty immaculate unlike other lipsticks that Ive used from nyx and ate (had that stuff all up in my teeth and chin, not cool..)

So can I agree with all these claims..? No, but I do agree it has major staying power if you don't eat AND it is utterly addictive. I know for sure this has to be my favourite lipstick by far,  I just need to rush out and get a lip liner to perfect this beautiful lip stain!

This lip stain is also perrrrfect for Autumn!!

Oh and with respect to removal, this easily comes off with makeup wipes surprisingly as I had seen reviews with people saying this stuff was awful to get off! :)

So.. if you couldn't be bothered reading all the above just read these quick pros and cons, and if you could you're amazing ! :)

Pros:
Long staying power
YES utterly addictive
Gorgeous pigmentation, like seriously A-MAZE-ING
Lovely packaging
Easy to remove with wipes!


Cons:
Sadly, it is transferable ):
You can't eat so called meals, but you could eat snacks as long as they don't pass your lips
NEED a lip liner, and a lip brush to apply it, you can't really just use the applicator as it has no precision

Till next times beauties, let me know how limecrime works for you because id LOVE to know!!
Laeken x


So you can see in this one below the colour feathers out on the bottom lips and top and there is more concentrated colour in some areas over others due to no lip liner/lip brush


Monday 14 April 2014

DIY Simple Elegant Storage for Makeup brushes/hair accessories

Hi Beauties!

So today I thought I would share with your guys some cheap simple ideas for storage rather than buying expensive storage!

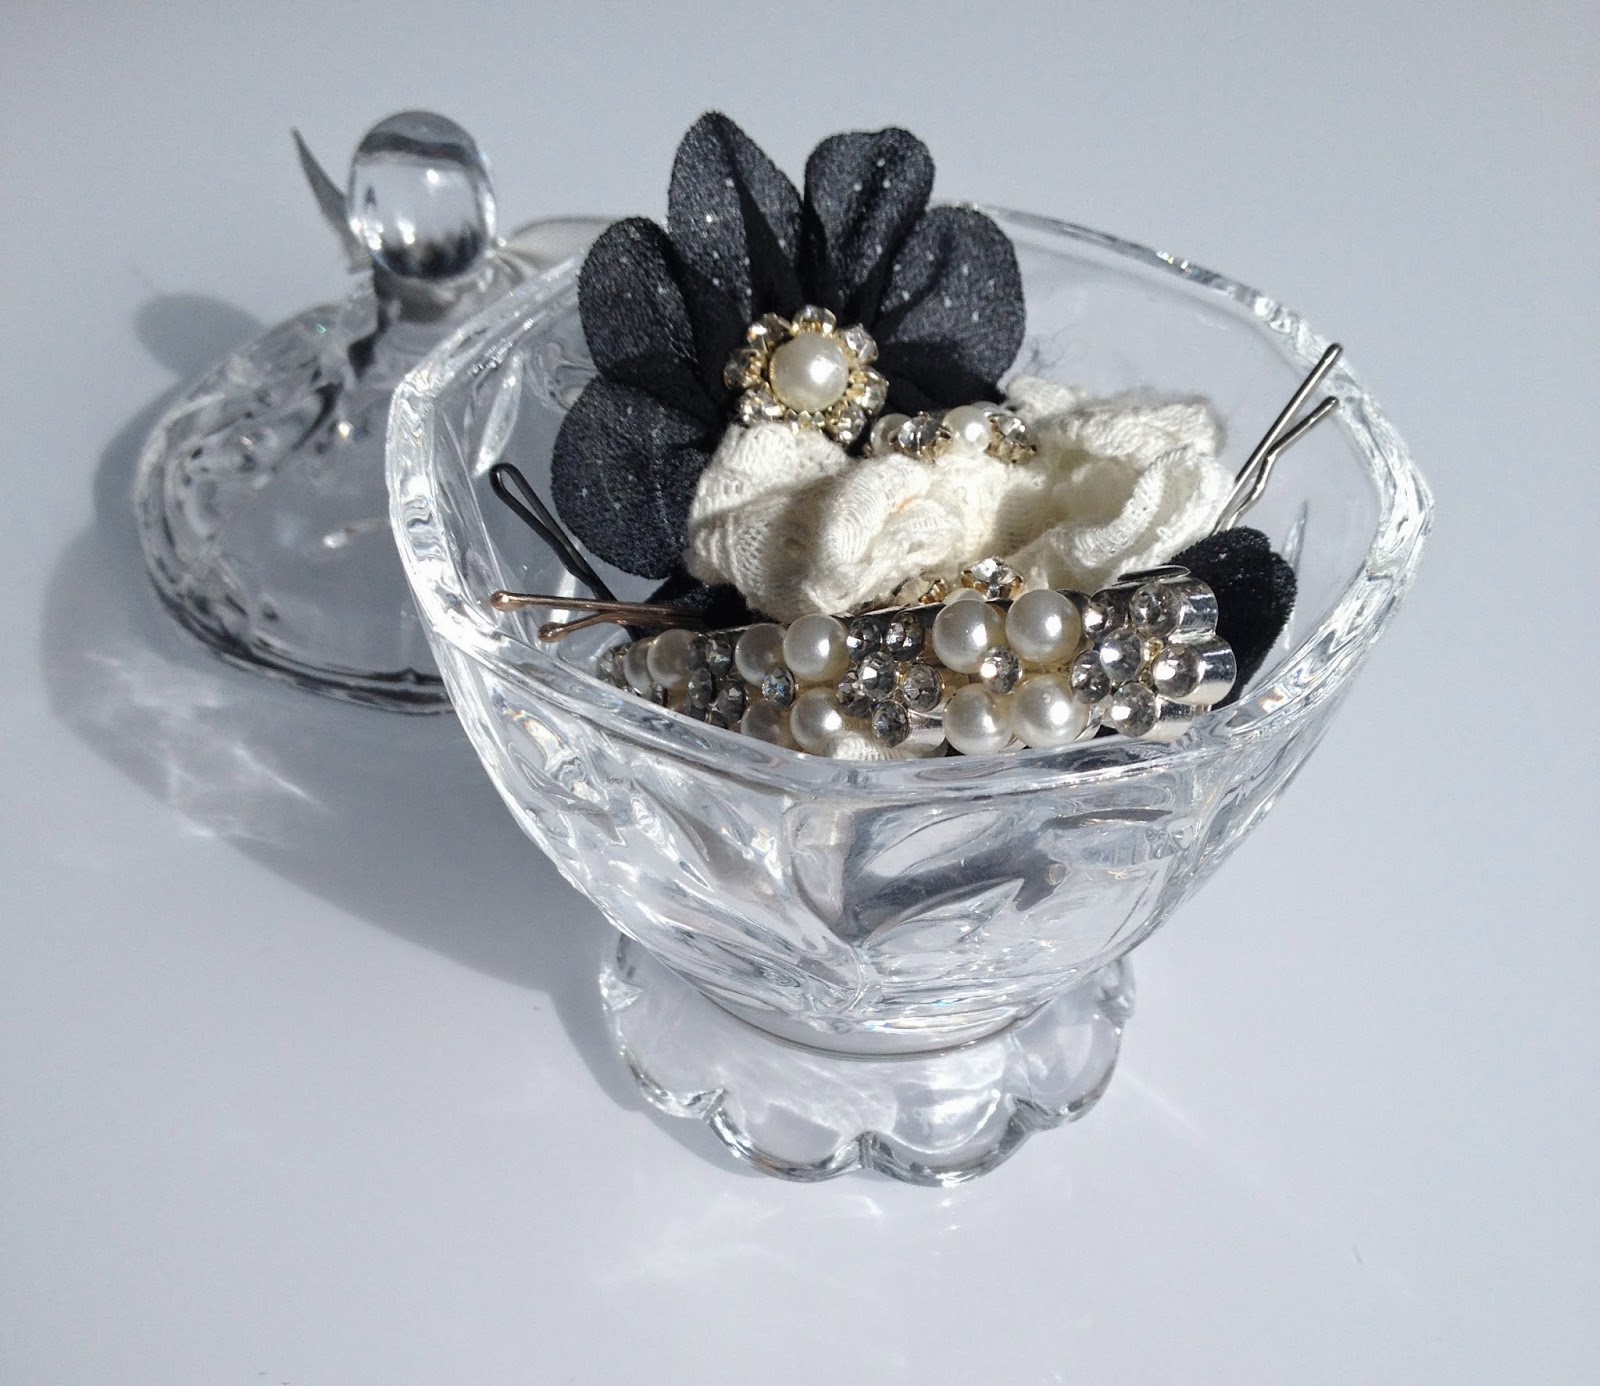
A while back for christmas I received a candle from bed bath and beyond which was from the sundae collection. I was more eager to use the candle as a container than I was to burn the candle because it was so beautiful! So I suggest visit your closest bed bath and body works/beyond or any warehouse/dollar store that stocks candles so you can get two uses out of this DIY. Even if they are cheap, not very nice smelling candles they will burn and evaporate into the air soon enough!


So if you want to know how to create your own elegant storage, keep reading !

After deciding I wanted to keep the glass container as a storage for makeup brushes/ hair accessories, I hopped to the nearest warehouse to look for beads to fill the container! I couldn't find any I was after so purchased some really cheap necklaces I could pull apart and fill up the candle container for both usage and appearance to achieve an elegant look!

Here are step by step easy instructions on how to achieve these looks, so simple!

Step 1:

Pop the candle container in the sink and apply dishwashing liquid and use a small tooth brush while the water in running to get rid of the blackness creating by the burning candle!


So it should go from this…..


To this! Now see the bottom part which is left over from burning the candle, you can either remove that with a knife, be careful! or just leave it in like I did! We are going to fill it with beads anyway!


So next… we fill our gorgeous container with some pearl beads, or any other ones of your choice!


Then just add your brushes ! with my one I could only add little brushes which is probably due to the fact that I had a little candle container but if you have a bigger one they will stay up!


Or, take the pearls out and pop your hair accessories in!


As you can see it is super duper easy! 
Have a lovely day and ill be back with a review on the new lime crime wicked soon this week so be sure to follow on bloglovin (just at the top on the left) to see the review!
Laeken 
x


Sunday 13 April 2014

Lets go Dancing in Glitter Sparkles CR Nail Polish DUO with #106 #01

Hi Beauties!

So as you all know I switch my nail polish up quite a bit trying different duos and combinations of glitter nail polish on opaque nail polish! So even if you don't have this brand in your country you can easily recreate this look! I purchased these nail polishes at the 1-8 mart, but I'm sure any dollar store by you would stock them! These retailed at $2.00!

Surprisingly this nail polish dries so quickly, and doesn't go all gunky like a lot of other cheap nail polishes or apply in a gluey like manner. It goes on really smoothly !


If you want to achieve this look, keep reading!

So first I used 3 coats of #100 to achieve an opaque look. If you have a more expensive nail polish you probably will only need one coat. This is a lilac - pink/silvery hue!


I then used #01 CR nail polish to add a touch of glitter specs of pink, limes and yellows which look beautiful in the sun or in artificial light when the glitter specs reflect the light! These specs don't stick out at all, so don't catch on anything! The picture to the left below the main one is in artificial lighting!


Till next time beauties! Laeken x